The post WPF Elliptical Layout Control – 3D! was way more popular than I ever could have imagined with people still viewing and downloading the code daily. Not bad for a post that’s 6 years old! However, as you can imagine the code and solution are pretty outdated now with a few unresolved issues. Given the amount of views it still gets, I decided it was time to revisit it and see if I can bring it up to date.
Luckily the project upgraded without issue to VS 2013. Then it built and ran just fine. That’s a good start! Firstly, the issues raised in comments:
- Fixing the Architecture
- Viewport3D Element Transparency Issue
- Rotation via mouse dragging
- Click handlers on child elements
- Animating a selected item to the front
Followed by some issues I discovered:
- The AssertTransform method had a bug whereby any existing transform would be overwritten.
- I didn’t like the dependency on the local
ResourceDictionary, so moved all the default values to code and added newDependencyPropertyproperties to set the camera and light source. - The rotation angle property setters coerce the angle to fall within 0 – 360. E.g. -180 would wrap to 180.
- Added methods to move the control on a per element basis, with or without animation.
- Added a method to move any element to the front of the carousel, with or without animation.
- Calculated layout properties that don’t change so often are now cached.
- A
DictionarymapsUIElementobjects to theirViewport3DVisual2Dwrappers. This avoids having to search collections when trying to find an element.
The code has also moved away from Google code (downloads were stopped in 2013) and is now on GitHub.
Fixing the Architecture
This issue wasn’t brought up in the comments but had a big impact on the control. Any control within the carousel wouldn’t pick up a style that should’ve been within scope. Why not? Well there was a break in the logical tree. Items that were added as the children of the control were actually added as children of a child of the control, breaking up the flow.
What’s the fix? Well back in 2008 Josh Smith and Dr WPF were also doing some funky custom panels for layout. Dr WPF went so far as to create some base panels that handled the issues Josh and I had encountered. Isn’t that nice! So all that was required was to add in those panels and sub-class his LogicalPanel instead of FrameworkElement. Simple as that!
Viewport3D Element Transparency Issue
This was a bit of a head scratcher and one of those times where I wish I had spent just Googled the issue before diving in head first. The actual cause of the issue had never occurred to me because it was just too simple.
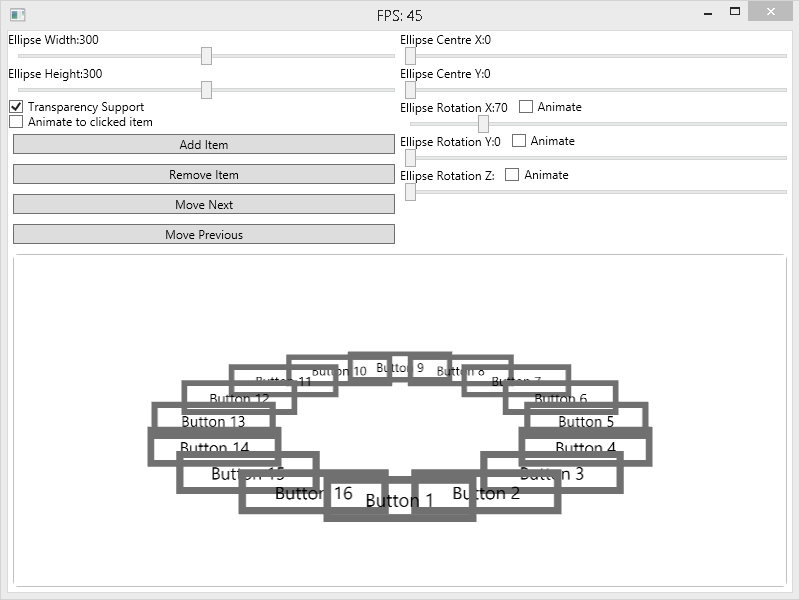
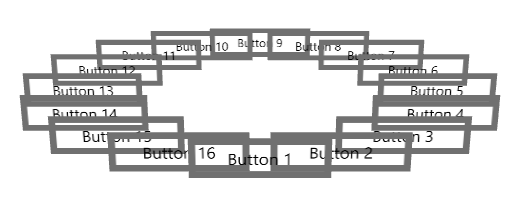
A few commenters had noted that when they used images with transparency for buttons, the transparent parts weren’t always transparent. I tested this by creating a bunch of buttons with a transparent background and lo and behold, something weird was happening. In my case, only buttons on one side of the carousel were rendering with transparency. All the buttons on the other side were rendering as if their backgrounds were still opaque, as shown below.

Initially I figured this must have something to do with the material or geometry objects I was using (the issue only appeared on elements on one side of the y-axis), however after checking and double checking them, the issue was still there. After checking everything else I could think of, almost to the point of firing up Snoop to see what was going on, I came across a post on the WPF3D team blog. The problem boils down to this:
Diffuse materials write to the depth buffer.
What does this mean exactly? The depth buffer is a way for the renderer to keep a track of the objects that are closest to the camera on a per-pixel basis. When evaluating the colour of a pixel the renderer will look at the distance of the object being considered and then look at the depth buffer to see if something closer to the camera has already been handled. If so, the renderer will ignore it as the object is occluded by something else and can improve performance by not having to process it.
Unfortunately the only way to work around this is to make sure that the items are rendered from back to front! I.e. make sure the children of the Viewport3D are sorted such that the first item in the Children collection is the object furthest from the camera and the last object in the collection is the closest object to the camera.
private void DepthSortChildren()
{
    var temp = new List(this.viewport3D.Children);

    temp.Sort(new SimpleDistanceComparer());

    this.viewport3D.Children.Clear();

    foreach (var child in temp)
    {
        this.viewport3D.Children.Add(child);
    }
}

public sealed class SimpleDistanceComparer : IComparer
{
    public int Compare(Visual3D x, Visual3D y)
    {
        var t1 = x.GetTransform3D();
        var t2 = y.GetTransform3D();

        if (t1 == null || t2 == null)
        {
            return 0;
        }

        return t1.OffsetZ.CompareTo(t2.OffsetZ);
    }
}
Note that the SimpleDistanceComparer is simple because it assumes the camera is located somewhere on the postiive Z-axis looking towards the origin and the Z-axis alone defines the depth of each item. If the camera was positioned along the X axis for example, this wouldn’t work.
A pretty simple solution in the end, although when the carousel is rotating objects are moving all the time meaning their depth is changing each frame. If we have to sort the collection each time we do a layout pass, performance is going to take a hit. After first implementing the sorting, the animated rotation of the carousel became noticeably slower (running in a VM on my MBA).
The solution quickly made itself evident, the only time you need to resort is when two objects pass each other. Because the items are laid out equidistant from each other around the circumference of the ellipse, all that is required is to check to see when the furthest (or nearest) item from the camera changes.
- Before a layout pass, the furthest item from the camera is noted. This is easy as it’s the last item in the Children collection
- During the layout pass, update the position of each item and record the furthest one from the camera
- At the end of the layout pass, if the new furthest item isn’t the same as the old furthest item, we have some sorting to do!
Rotating via the Mouse
This problem boils down to capturing mouse events and translating mouse movement to a rotation. As with all WPF controls, make sure you set a background on the element you wish to capture mouse events on, otherwise the control won’t receive mouse events when clicking on the whitespace.
private Point lastMousePosition;

private void CarouselMouseButtonDown(object sender,
    MouseButtonEventArgs e)
{
    this.lastMousePosition
        = e.GetPosition(this.ellipsePanel3D);

    this.ellipsePanel3D.MouseMove
        += this.CarouselMouseMove;
    this.ellipsePanel3D.PreviewMouseLeftButtonUp
        += this.CarouselMouseButtonUp;
}

private void CarouselMouseButtonUp(object sender,
    MouseButtonEventArgs e)
{
    this.ellipsePanel3D.MouseMove
        -= this.CarouselMouseMove;
    this.ellipsePanel3D.PreviewMouseLeftButtonUp
        -= this.CarouselMouseButtonUp;
}

private void CarouselMouseMove(object sender,
    MouseEventArgs e)
{
    var mousePosition
        = e.GetPosition(this.ellipsePanel3D);

    var delta
        = mousePosition.X - this.lastMousePosition.X;

    this.ellipsePanel3D.EllipseRotationY += delta;

    this.lastMousePosition = mousePosition;
}
Assignment of the control’s MouseLeftButtonDown event to the CarouselMouseButtonDown handler takes place in the Window’s XAML file.
A MouseLeftButtonDown event on the panel (and not intercepted by a child control), will cause the control to start listening for the MouseMove and PreviewMouseLeftButtonUp events. Whenever the mouse moves, the change in the mouse’s X component is used to change the EllipseRotationY property of the Carousel, thus rotating the carousel by the amount the mouse moved.
Handling Clicks on Child Elements
I mentioned in the list of points above that I had fixed the architecture of the control to ensure that the logical and visual tree are properly maintained. As a result of this styles can now be used and will work as expected. Because the items added to the carousel are just UIElement objects, you can add whatever event handlers you like to them. The carousel control doesn’t care about any of this and leaves it up to you.
The simplest way to add an event handler to your elements is via a style. For example, if we wanted to set a click handler for all the Button objects that are added, you would use the following style:
<Style TargetType="{x:Type Button}">
    <EventSetter Event="Click" Handler="ItemClick"/>
</Style>
Of course in the real world you wouldn’t dream of defining event handlers in the code behind for the window, you’d be using some flavour of MVVM and commands. No problem, just bind the command instead:
<Setter Property="Command" Value="{Binding SomeCommand,
        RelativeSource={Relative Source AncestorType={x:Type Window}}}">
Animating a selected item to the front
This is a fairly trivial problem to solve requiring a bit of vector mathematics and some of that lovely WPF animation system. The problem can be broken down to three steps:
- Find the location of the item to rotate to the front of the carousel.
- Calculate the angle between the item and front of the carousel.
- Rotate the items around the circumference by the angle calculated above, using an animation if required.
All of this is actually pretty simple!
- The position of the selected item is stored in the object’s translation transform
- We know how to calculate a point on the ellipse and the front position is calculated when finding the location for the first item
You now have two points in space, which if treated as vectors we can easily find out the angle between them using the dot product. Combine this with the cross product and then we even know whether we need to rotate clockwise or anti-clockwise. Note that the carousel is centred about the world’s origin, so no need to offset the vectors.
.Net makes the process a little simpler by providing the Vector3D.AngleBetween method, removing a few steps like calculating the inverse cosine of the angle and converting it from radians to degrees.
The last step is to then create an animation that rotates the carousel from its current position such that the selected item is positioned at the front. As luck would have it, the properties controlling the orientation of the carousel are dependency properties so they’re all ready to go for animation. The code will rotate the carousel in the direction that results in the shortest distance for the item to travel. If you want it to always rotate in the same way you’ll need to modify the code to do so.
Note that there is an event added to the storyboard’s Completed event which sets the value of the rotation property. If you’re not sure why this step is necessary, take a look at Dependency Property Value Precedence. If the value is not set, it will fall back to the value it had before the animation and using FillBehavior.HoldEnd will prevent further changes to the value from taking effect.
The code looks like this:
public void AnimateIntoView(UIElement element, bool animated)
{
    if (!this.elementModelMap.ContainsKey(element))
    {
        return;
    }

    var nextItem = this.elementModelMap[element];

    var frontOfEllipse
        = MathHelper.GetPointOnEllipse(ellipseRect, -HALF_PI);
    var frontPosition
        = MathHelper.RotatePoint3D(
            new Point3D(frontOfEllipse.X,
                        frontOfEllipse.Y,
                        0d),
            -EllipseRotationX, 0d, 0d);

    var itemTransform
        = nextItem.GetTransform3D();
    var itemPosition
        = new Point3D(itemTransform.OffsetX,
                      itemTransform.OffsetY,
                      itemTransform.OffsetZ);

    var vec1 = new Vector3D(frontPosition.X,
                            frontPosition.Y,
                            frontPosition.Z);
    var vec2 = new Vector3D(itemPosition.X,
                            itemPosition.Y,
                            itemPosition.Z);
    vec1.Normalize();
    vec2.Normalize();

    var direction
        = Math.Sign(Vector3D.CrossProduct(vec1, vec2).Y);

    // Calculate the dot product of the two
    var angle
        = Vector3D.AngleBetween(vec1, vec2) * direction;

    if (animated)
    {
        var doubleAnimation
            = new DoubleAnimation(this.EllipseRotationY - angle,
                                  TimeSpan.FromSeconds(1));
        Storyboard.SetTargetProperty(doubleAnimation,
            new PropertyPath(Carousel3DPanel.EllipseRotationYProperty));

        var storyboard = new Storyboard();
        storyboard.Children.Add(doubleAnimation);
        storyboard.Completed += (o, s)
            => { this.EllipseRotationY -= angle; };

        storyboard.Begin(this);
    }
    else
    {
        this.EllipseRotationY -= angle;
    }
}
In the demo application, I make use the code from the previous section on handling click events to trigger the animation of the clicked item to the front of the control.
Stepping Left and Right
Given that we can rotate to any arbitrary object, it’s a simple step to add methods which move the item to the left or right of the front item to the front. Two methods were added to the control to achieve this:
public void RotateRight(bool animated);
public void RotateLeft(bool animated);
The first method will rotate the carousel such that the next item clockwise is at the front. The second method does the same but anti-clockwise. The methods are very similar in their implementation, figuring out the index of the next element to bring to the front and using that to get the element and hand it off to the AnimateIntoView method.
public void RotateRight(bool animated)
{
    // If there's only 1 item here, there's nothing to rotate.
    if (base.Children.Count < 2)
    {
        return;
    }

    // We know the viewport children are sorted by depth, so the last item is
    // the front most item.
    var frontMostItem = this.viewport3D.Children.Last() as Viewport2DVisual3D;
    var frontIndex = this.Children.IndexOf(frontMostItem.Visual as UIElement);
    var nextIndex = (frontIndex + 1) % this.Children.Count;

    this.AnimateIntoView(base.Children[nextIndex], animated);
}
Summary
WPF is far from dead and hopefully this code is still useful to some of you out there. It would be great to see some comments about what you're using it for and any feedback you have. If there's something not working or something missing, let me know and I'll see what I can do. And now that the code is on GitHub, feel free to send a pull request with your own modifications.