Recently I took another look at Bitbucket’s Pipelines offering, their successor to Bamboo cloud which was removed last year (but lives on as an on-premise solution). Pipelines had previously been uninteresting to me as there was no support for traditional .NET apps, but now that I’m dealing more with .NET Core, I figured it would be worth a look. As it turns out, I abandoned this approach almost as soon as I had things up and running, choosing to go with the built in support offered by Azure App Services. A guide on that will appear soon.
The premise is cool, builds are run in Docker containers, defined using YAML and you get 50 build minutes included in the free account, with all the triggers and notifications you’d expect, e.g. allowing you to fire off Slack notifications to keep your team informed of the build health. If your code is sitting in a Bitbucket repo, it makes sense to try and keep everything under one roof (always with an alternative solution of course, you never know when that roof will collapse!).
I started off by following the guide provided by Atlassian and the YAML from this repository which immediately resulted in errors. Getting the build definition in to shape took a bit of messing around so I decided to write this post in the hopes that a) you can laugh at the silly mistakes I made along the way and b) provide a more up to date and comprehensive guide to deploying an application to the Azure App Service using Bitbucket Pipelines.
Trials and Errors
Problem #1 – Builds not being triggered
Cause: Incorrect casing of the branch name in the build definition file, ‘Development’ vs. ‘development’ (who would name the development branch ‘Development’ anyway?!).
Solution: Correct the casing in the bitbucket-pipelines.yml file.
Problem #2 – Error building the solution
+ dotnet build $PROJECT_NAME
Couldn't find 'project.json' in 'PROJECT_NAME'
Cause: This was the result of project.json being a dotnet core 1.0 feature which is now deprecated in version 2.0.
Solution: As this is a dotnet core 2.0 project, I needed to use a different Docker image, and changed the Docker image from
image: microsoft/dotnet:onbuild
to
image: microsoft/dotnet:2.0-sdk
Problem #3 – Error restoring Nuget packages
  + dotnet restore
  MSBUILD : error MSB1003: Specify a project or solution file. The current working directory does not contain a project or solution file.
Cause: It would appear that at some point between version 1 and 2, an error is raised instead of a warning when the restore command is unable to find a project/solution file. The repository was structured such that the solution was in a folder off the root directory.
Solution: Pass in the path to the solution file to the restore command. E.g.
- dotnet restore FolderWithSolution/MySolution.sln
Problem #4 – Error pushing to the Azure App Service Git repository
  + git push https://$AZURE_LOGIN:$AZURE_PASSWORD@appservicename.scm.azurewebsites.net/appservicename.git master
  error: src refspec master does not match any.
  error: failed to push some refs to 'https://username:$AZURE_PASSWORD@appservicename.scm.azurewebsites.net/appservicename.git'
This tripped me up as I hadn’t taken the time to process what the error was telling me and ended up on a bit of a wild goose chase, resulting in me cloning the App Services Git repository locally and creating a master branch. Note: Do not do this, jump to #6 to see why.
Cause: The build was being executed on the Development branch, but I was trying to push code to the App Services’ master branch.
Solution: Change the Git push command, specifying the source and destination branch names:
git push https://$AZURE_LOGIN:$AZURE_PASSWORD@appservicename.scm.azurewebsites.net/appservicename.git Development:master
Problem #5 – Error pushing to the Azure App Service Git repository, take two
+ git push https://$AZURE_LOGIN:$AZURE_PASSWORD@appservicename.scm.azurewebsites.net/appservicename.git Development:master
  fatal: unable to access 'https://username:$AZURE_PASSWORD@appservicename.scm.azurewebsites.net/appservicename.git/': Illegal port number
Well that’s weird! HTTPS is pretty standard after all no? Just for good measure I went and changed the Git push command again, adding the port in:
git push https://$AZURE_LOGIN:$AZURE_PASSWORD@appservicename.scm.azurewebsites.net:443/appservicename.git Development:master
Alas the error persisted.
Cause: Embarassingly, the value for the $AZURE_PASSWORD environment variable contained a colon. Oh dear, schoolboy error! That’s what you get for trying to generate a super secure password.
Solution: Change the Azure App Services deployment password such that it doesn’t contain any characters that will break the URL.
Problem #6 – Error pushing to the Azure App Service Git repository, take three
  + git push https://$AZURE_LOGIN:$AZURE_PASSWORD@appservicename.scm.azurewebsites.net:443/appservicename.git Development:master
  To https://appservicename.scm.azurewebsites.net:443/appservicename.git
   ! [rejected]        Development -> master (fetch first)
  error: failed to push some refs to 'https://username:$AZURE_PASSWORD@appservicename.scm.azurewebsites.net:443/appservicename.git'
  hint: Updates were rejected because the remote contains work that you do
  hint: not have locally. This is usually caused by another repository pushing
  hint: to the same ref. You may want to first integrate the remote changes
  hint: (e.g., 'git pull ...') before pushing again.
  hint: See the 'Note about fast-forwards' in 'git push --help' for details.
Cause: Sigh. In order to create the master branch in problem #4, I had to push a commit, which meant that the repository had changes that would need to be merged. Something felt very wrong here so I decided to reset the Azure App Service Git repository, which is easier said than done.
Solution: I ended up deleting and re-creating the App Serivce, using the same details as before so that I wouldn’t have to go through and update my build definition and environment variables.
Success
At last, I saw a nice green build indicator. Finally! I’d eaten through 13 of those precious 50 build minutes by this point, but it was working and the builds were relatively quick, taking around 3 minutes apiece. Here’s what the bitbucket-pipelines.yml looked like at this point:
image: microsoft/dotnet:2.0-sdk

pipelines:
  branches:
    Development:
      - step:
          caches:
            - dotnetcore
          script:
            - dotnet restore SolutionName/SolutionName.sln
            - dotnet build SolutionName/ProjectName
            - git push https://$AZURE_LOGIN:$AZURE_PASSWORD@appservicename.scm.azurewebsites.net:443/appservicename.git Development:master
Once the code was being deployed, I hit the next issue. This repository contained a solution with two ASP.NET Core web apps and I couldn’t easily figure out how to specify which project to deploy. Deploying the entire build output would always result in the first website being active. At this point, due to other checkins, all of those 50 build minutes were used up! Towards the end, when building two projects, the builds were hitting 9 minutes. Rather than pony up the $10 for another 1000 minutes, I took my search elsewhere.
The Recipe for Success
If you want to give Bitbucket Pipelines a spin and would like to avoid my mistakes, follow this guide. These steps assume three things:
- You already have your app code sitting in a Bitbucket repository.
- You have an active Azure subscription and have already created your App Service.
- Your .NET Core solution has a single project you wish to deploy.
This guide will bypass the Bitbucket Wizard for adding the bitbucket-pipelines.yml file to your repository as it only allows you to commit this directly to your master branch. If that’s ok with you, then follow the wizard (just access the Pipelines for your repository and follow the steps), however the steps below will result in the same outcome.
Please refer to the Atlassian documentation for the bitbucket-pipelines.yml file specification.
Note: Pipelines will only run for branches in which the bitbucket-pipelines.yml file exists and are defined in the build file (unless you only use a default configuration). Depending on your Git workflow, you may want to add this file to a development branch first, then propagate it to other branches by merging.
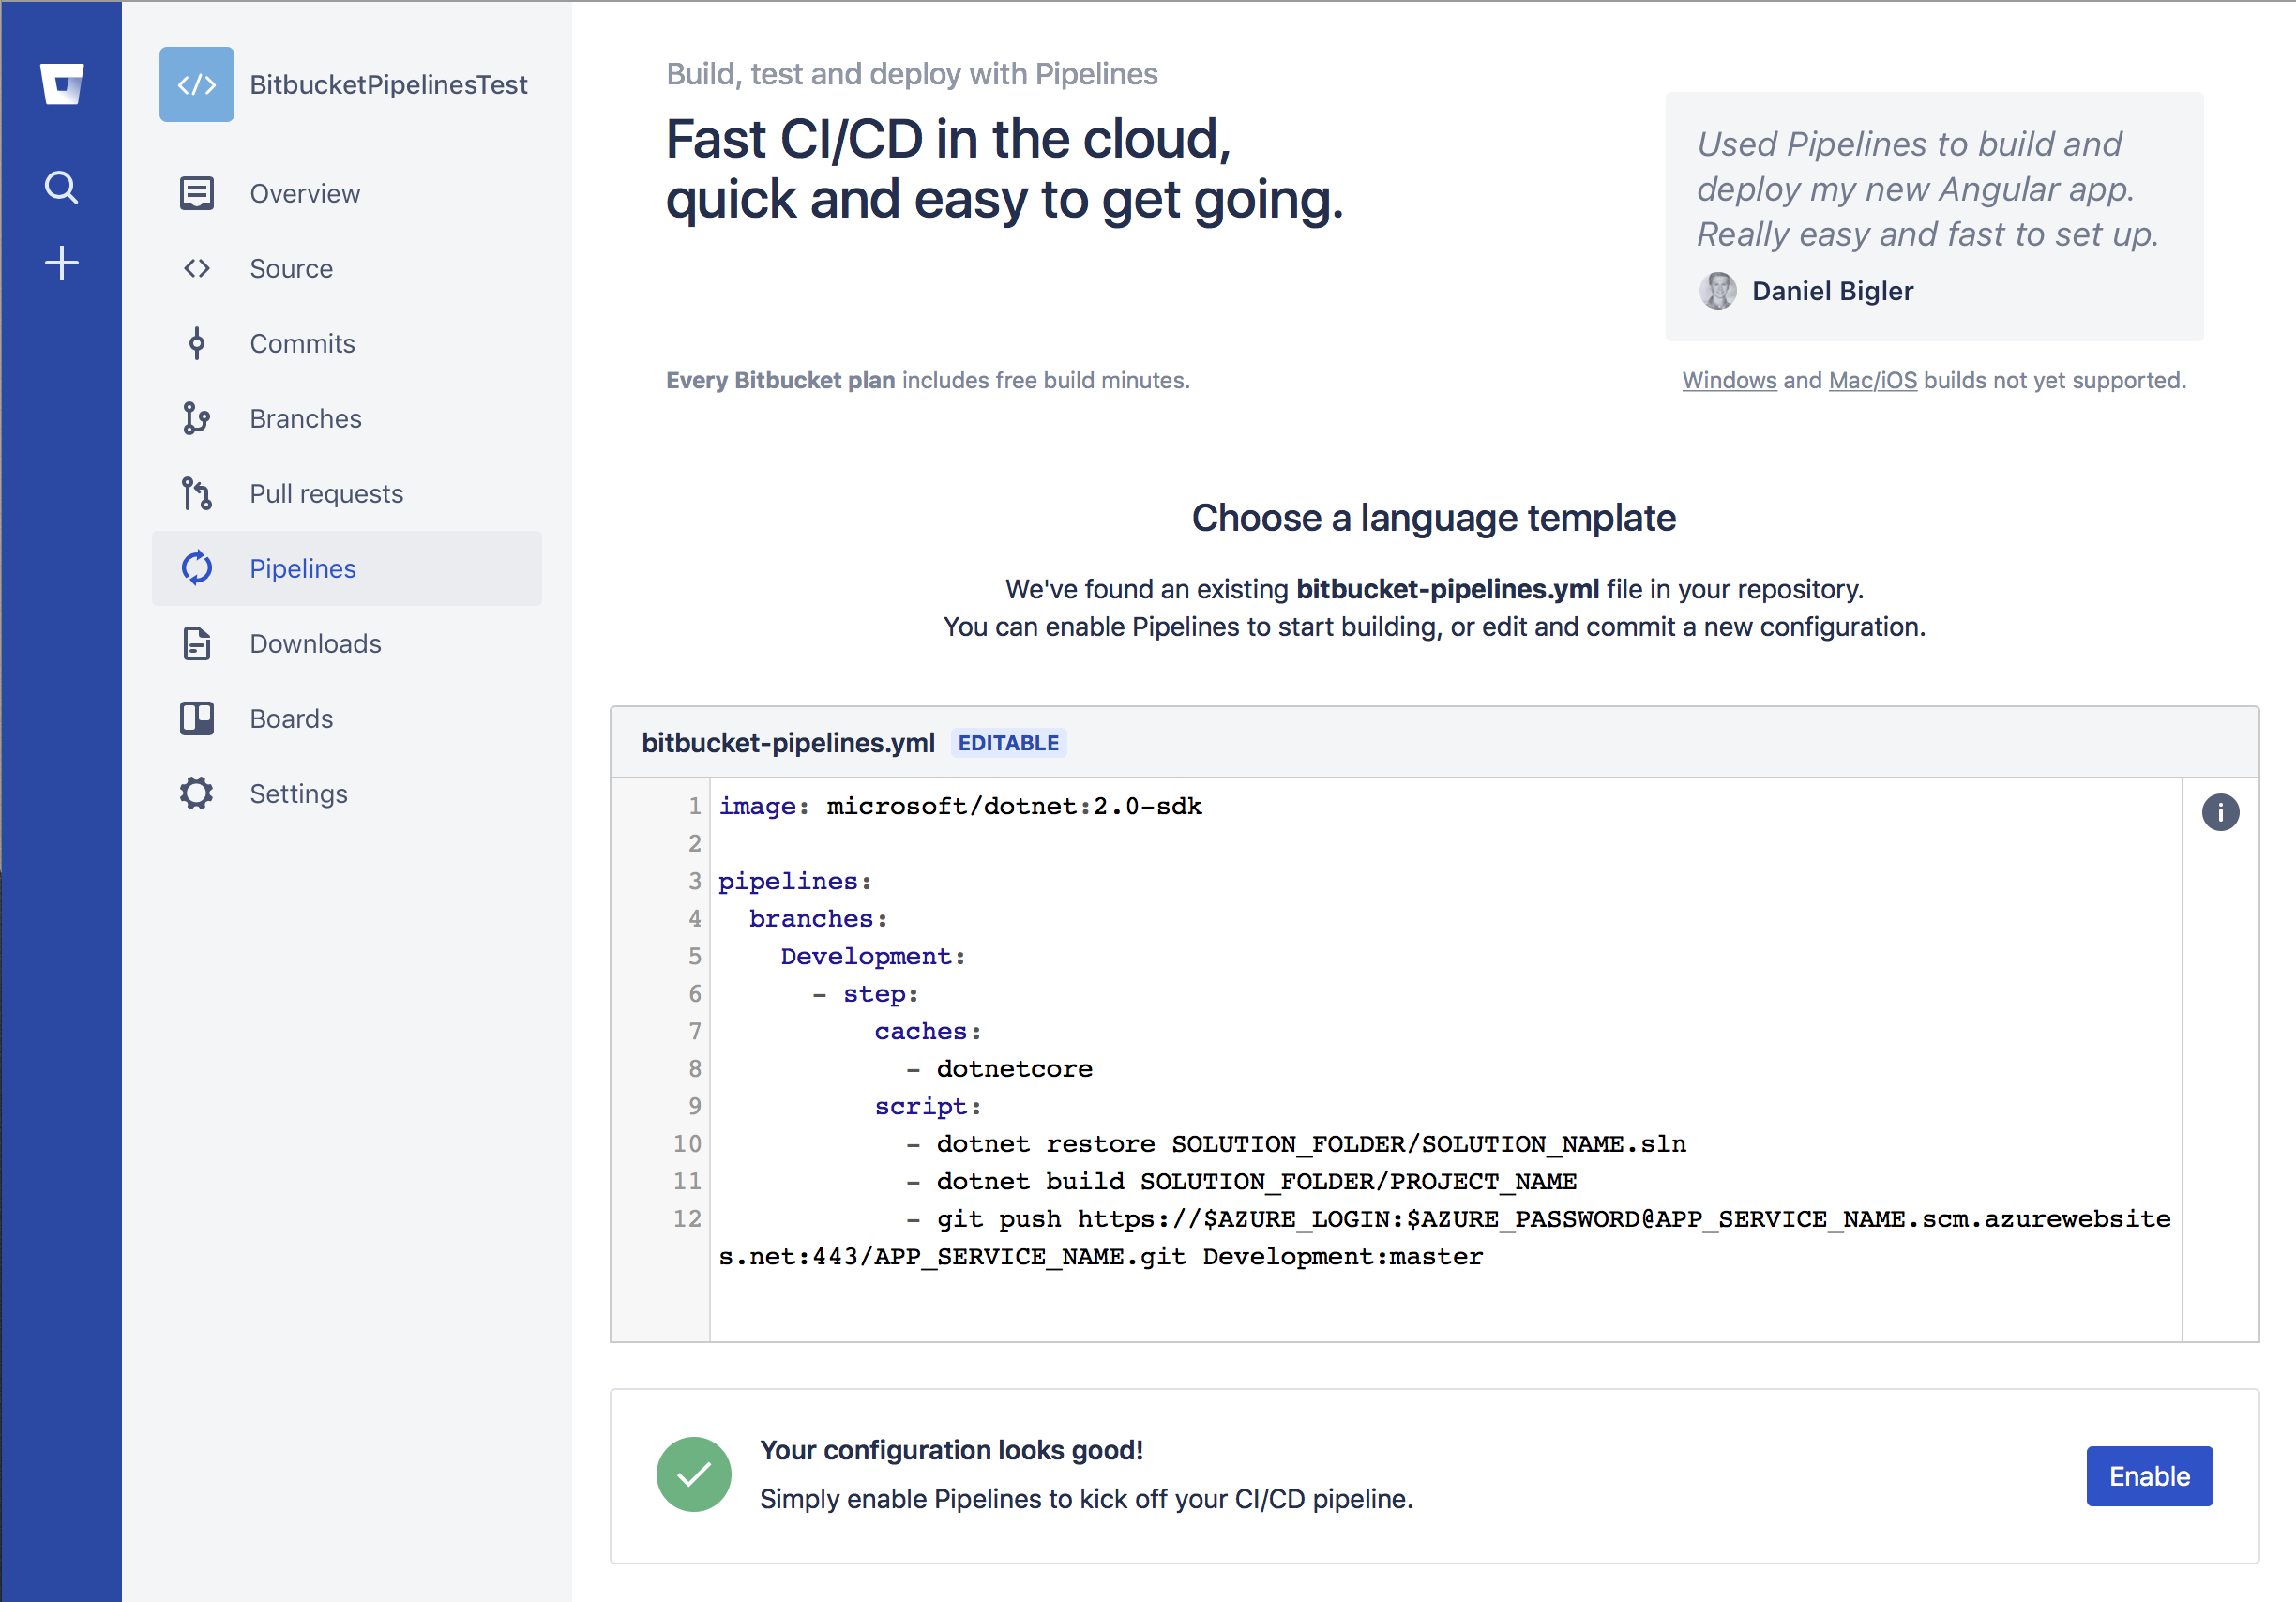
- Create a new text file, in the root of your repository on the desired branch, with the name
bitbucket-pipelines.yml - Paste in the following content:
image: microsoft/dotnet:2.0-sdk pipelines: branches: BRANCH_NAME: - step: caches: - dotnetcore script: - dotnet restore SOLUTION_FOLDER/SOLUTION_NAME.sln - dotnet build SOLUTION_FOLDER/PROJECT_NAME - git push https://$AZURE_LOGIN:$AZURE_PASSWORD@APP_SERVICE_NAME.scm.azurewebsites.net:443/APP_SERVICE_NAME.git BRANCH_NAME:master - Go through and replace the values for the following to match your setup:
BRANCH_NAMESOLUTION_FOLDERSOLUTION_NAMEPROJECT_NAMEAPP_SERVICE_NAME
- If you don’t have multiple branches to deal with, you can omit the
branches:and branch name (BRANCH_NAME:) lines, replacing them withdefault: - Commit the file and push to your remote
- If you did everything right so far, you should be able to navigate to the Pipelines section of your Bitbucket repository, scroll down and see the contents of your bitbucket-pipelines.yml file in the validator. If there are any validation errors, correct them now
- Click the
Enablebutton
- To define the username and password that will be used to push to your App Service’s Git repository, you have two options. Follow this guide to set those credentials.
- With the credentials in place, open the repository in Bitbucket and navigate to Settings -> Pipelines -> Environment Variables
- Add a new variable called
AZURE_LOGINand set the value to your deployment username. Mark this as secured if you like - Add a second variable called
AZURE_PASSWORD, setting the value to your deployment password. It’s recommended that you mark this as secured to prevent it appearing in logs - Commit a change to the branch you added the bitbucket-pipelines.yml file to and you should be all set! If you hit any errors, check out the list of problems I ran in to and see if you’re experiencing the same. Otherwise, hit up Google, or ask a question in the comments below